ROM GURUS: How to

Looking for firmware, Stock ROM or how to go about that phone problem? You are in the right place, get all you want here for free...

https://static1.freebitco.in/banners/728x90-3.png
Showing posts with label How to. Show all posts

Wednesday

How to Screen cast on Android – Step by Step

8:57 pm 0
How to Screen cast on Android – Step by Step
If you would like to record screencast videos of your own Android phone, the good news is that you don’t need to install any app nor do you have to root your device. The not-so-good news is that you can only capture screencasts on phones (or tablets) that are running Android 4.4 or later. Also, screencasts will not have any audio.
How-to-Screen

Step 1: Prepare your Android Device for Screencasting

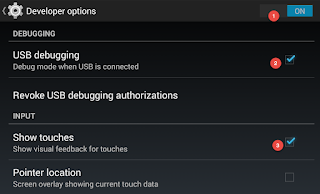
Open your Android phone settings and go to About Phone, the last option in the list. Next tap Build Number seven times in quick succession and you’ll see a message saying that Developer Options have been enabled in your device.

Step 2: Prepare your computer (Windows or Mac)

We need to install the Android SDK on our desktop. This is simple. All you have to do is download the SDK in a zip file from the android.com website and unzip the file anywhere on your computer.

The Android SDK is available for both Mac and Windows.

Step 3: Connect your Android phone to the desktop

First connect your Android phone to your computer though the regular micro USB cable. The phone will display a prompt asking you to “Allow USB debugging.” Tap OK to continue.

Step 4: Record the Screencast Video

Run the follow command to enter recording mode. Advanced users may refer to the help manual to learn about the various options supported by screenrecord.

adb shell screenrecord --verbose ./sdcard/screencast-video.mp4

If you are using a Mac, you the command line code should be written as:

./adb shell screenrecord --verbose ./sdcard/screencast-recording.mp4

Now switch to your phone and whatever you do here will get recorded in the video. When you are done, go to command window and press Ctrl + C to stop the video recording. The screencast is now saved in your Android phone.

You can use a File manager app, I prefer File Wrangler, to search for the screencast-video.mp4 file on the phone and transfer it to your desktop for editing.

Friday

How To Fix Dead Tecno Camon C8 Devices

2:04 am 0
How To Fix Dead Tecno Camon C8 Devices
How-to-fix-dead-Tecno-Camon-C8-devices
This simple guide will teach you how to fix a dead Tecno Camon C8.
So many of us,  mostly trial versions testers, are into frequent upgrading & downgrading of ROM. But what if you mistakenly shifted your laptop or cable & your phone refuses to respond at all? It happened to me so, I used this method to unbrick my prestigious Camon C8, it will surely work for every other MTK device.

Thursday

How To Make G00gle Assistant Work On Any Android Devices

5:31 am 0
How To Make G00gle Assistant Work On Any Android Devices
This brief tutorial will school you on how to make G00gle Assistant work on your Android device, no matter the OS you are running. Stay back and read carefully.

How-To-Make-G00gle-Assistant-Work-On-Any-Android-Devices

After doing away with it's popular Nexus line-up, yours truly G00gle, has finally become a mainstream Android manufacturer with Pixel. One of the most stunning features of g00gle Pixel is the new AI assistant which seems like a nice alternative to Siri, and you’ll be very glad to know that there is a way to enable G00gle Assistant on any Android device, meaning that you don't necessarily need to buy a pixel phone.


While there are a lot of reasons you would want to get one, I don't think most Android users won’t be jumping the ship right away.

However, to get the best of AI and personal assistance, you will need the following things to get started.

1. An Android device running Android 7.0 Nougat or higher.
Android 7.0, I  know most OEMs haven't upgraded their devices to 7.0 yet but if you're lucky to have Upgraded to Nougat , you can continue with this.

2. Root access.

3.The latest version of G00gle app (version 6.5.35.21 or newer) installed on the device.

How to enable G00gle Assistant on any Android Nougat device

To begin using the G00gle Assistant service, you need to add or replace a line to your device’s root files. In order to access the root directory, you will need a file explorer with root access, so go ahead download any free app like  ES File Explorer from the g00gle Play Store.

Please read the following Instruction carefully in other not to damage your device

Once downloaded, grant the app Superuser access and head over to the root partition of your device, which is the highest folder in the folder tree. From the root directory, access the “System” folder and make sure that the directory is mounted as read/write (Mount R/W). Scroll down to the bottom of the folder to find a file named “build.prop ” and long-press it. On the “Options” menu that appears, press “Open with” and then select “Text Editor” from the pop-up window.


Once you have the “build.prop ” file open in the text editor, scroll down to the bottom of the list and enter these lines:

ro.product.model=Pixel XL
ro.opa.eligible_device=true


Once you have entered the code line mentioned above, press the menu button and save the changes you have made. To make sure that g000gle Assistant works without any issues, wipe the cache and the data of the G00gle app.

Restart your Android device once you have saved the file and exited the file manager app. 

You are done!!

How To Flash Android 7.0 Nougat on Nexus Devices

12:17 pm 0
How To Flash Android 7.0 Nougat on Nexus Devices
With Android 7.0 Nougat, Google seems to be getting even faster at offering OTAs, with half our team already having the OTA downloaded and installed. Still, not everyone will probably get it that fast, and sometimes you don’t want to wait. Or perhaps there’s a reason you want a clean install (too much old bloat on your device, etc). In those situations, starting from scratch is certainly worth considering. If you’ve never done it before, there are a few hoops to go through, but nothing too difficult.
Nougat is here, though getting it to all devices is a whole other story.


For those that are familiar with flashing, there’s really nothing new about this process with Android 7.0. That said, if you’ve never unlocked the bootloader in your Nexus 6P or 5X, it is worth noting that you absolutely need the latest version of the Android SDK (which you should install anyhow) — as these devices only recognize the new command for unlocking the bootloader – fastboot flashing unlock.

For those that have never flashed an update at all, this guide will take you through everything you need to know about the process.


What will you need before you get started?
  •  A Nexus device along with a USB cable to connect it to your computer. 
  • The Android SDK installed on your machine with ADB and Fastboot command successfully working.
  • You’ll also need the appropriate factory image for your Nexus device. It’s worth it to spend a moment to make sure you have the right one rather than have to deal with the issues of downloading the wrong one.
  • You’ll also need 7zip or a similar program that can handle .tgz and .tar files.
  •  You will also need to unlock your Nexus bootloader. Beware, this will erase your data. It’s also worth noting that flashing a factory image will also erase your data. Make sure to back it up!

Unlocking your bootloader

Before you get started, if your phone’s bootloader has never been unlocked, you’ll need to do a few extra steps before manually installing Android Nougat. Remember, opening the bootloader will reset your phone, losing all personal data.

How-To-Flash-Android-7.0-Nougat-on-Nexus-Devices

With that out of the way:

    1) Turn off your Nexus.
    2) Hold down power and volume down buttons.
    3) On your Nexus type ./fastboot flashing unlock
    4) Press volume up and power button to confirm bootloader unlock.
    5) Type ./fastboot reboot — that’s it. You’re now unlocked and ready!


How to manually install Android Nougat on a Nexus device

Keep in mind that this process is pretty straightforward, but things can and do go wrong if you don’t carefully follow instructions. In other words, proceed at your own risk. With that out of the way, here’s what you need to do:

   1)  Boot your Nexus device into fastboot mode. You do this by turning it off and holding down the volume up + volume down keys and then pressing power. That should work for all modern Nexus devices but if not, you may need to Google Search how to do it on yours.
  2)  On your computer, use 7zip to extract the .tgz file you downloaded from the Android Developer website. Use 7zip a second time to extract the .tar file you extracted from the .tgz. When you’re done, you should have a folder with several files in it.
   3) Copy all of these files and paste them in the platform-tools folder in the Android SDK on your computer. If you followed the above tutorial, this should be under the C drive, then under Program Files (x86) on Windows. Linux users, you know where you put it.

  4)  If you have not already done so, connect your Nexus device to your computer. ADB and Fastboot commands should already work at this point if you’ve been following along.
  5)  There are two flash-all files. If you’re in Windows, you’ll want to double click the one that has the gear logo and says “Windows Batch File” on the right. If you’re on Linux, you’ll want to double click the flash-all.sh.
  6)  At this point a box should pop up and you should see the installation taking place. While this is going on, do not unplug your device for any reason. Let it do its thing.
  7)  Once the installation process as finished, your device will automatically reboot and you should see the official Android 7.0 Nougat boot animation start up. You can now safely disconnect your device from your computer. Congrats, you now have Nougat!

If you have any issues, check out the Android Authority Forums and ask there. You can also post a comment below, and we’ll do our best to help you out, and invite other readers to pitch in as well. Good luck, have fun, and we hope you enjoy Android Nougat!

Friday

How To Install adb Fastboot On Android Devices

3:15 am 2
How To Install adb Fastboot On Android Devices

How-To-Install-adb-Fastboot-On-Android-Devices

This tutorial explains how to install ADB, Fastboot and their drivers.


Requirements

Install Mediatek (MTK) drivers on the PC using the PdaNet method click here to download

Download the ADB, Fastboot & Drivers Installer click here to download

Run the Installer as Administrator

For Do you want to install ADB and Fastboot? tap the Y key then press Enter

For Install ADB system-wide? tap the Y key then press Enter

Wait till its complete

For Do you want to install device drivers, tap the Y key then press Enter

In the installer Wizard that pops up, click Next

Click Finish when done

Go to My Computer / Local Disk ( C: ) , you should see a folder named adb

To run ADB or Fastboot, open the ADB folder

Hold down the SHIFT key on the keyboard

While holding SHIFT, right-click on an empty space in the ADB folder

Select Open command window here.


This method is very simple please proceed and apply with caution!!

Thursday

How To Unlock Moto X Play Bootloader

5:01 am 0
How To Unlock Moto X Play Bootloader
How-To-Unlock-Moto-X-Play-Bootloader


This simple tutorial will teach you how to unlock Moto X Play bootloader. This device is the third generation Moto X smartphone which was launched by Motorola. The smartphone comes with amazing design and good hardware configuration. Moto X Play has a 5.5-inch display screen. The display which comes with this smartphone is a capacities touchscreen corning Gorilla glass 3 protection display. You will get resolution of 1080 X 1920 pixels with the display of the Moto X Play. The device comes with powerful hardware as you get a 1.7 GHz Octa core processor and 2 GB RAM. One of the best things about the Moto X Play is the camera. The smartphone is powered with a 21 Mega pixel camera which you can use to capture amazing shots.


If you want to unlock bootloader of Moto X Play you are at the right place. Today in this guide we are going to tell you how to unlock bootloader of Moto X Play.


Requirements

To learn how to root this device, click here


1) Your Moto X Play smartphone should have more than 80% of battery present in it.


2) Create backup of all the data which is present in your Moto X Play smartphone as all data will be lost once bootloader is unlocked.


3) Install Fastboot and ADB Tools on your PC. If Fastboot and ADB Tools are not installed on your PC you can download them from here. Download and install drivers or Moto X Play from here.


4)USB Debugging should be enabled. To enable USB debugging go to Settings > About Phone. Now you have to tap build number 5-7 times. Return to Developer Options and open it. Now select USB debugging from there.


Here is how to unlock bootloader of Moto X Play

1) First of all enter bootloader menu of your device. To enter bootloader menu of Moto X Play, press Volume Down + Power buttons for around 5 seconds.


2) As soon as you have entered bootloader menu, connect your Moto X Play smartphone with your PC using USB cable.


3) Open the folder where you have installed Android SDK or ADB and Fastboot tools. If you are installed Android SDK you need to go to C :> Android SDK > Platform – tools. Now you have to open command window here. To open command window press Shift Key + right mouse From the list which appears in front of you select open command window here.


4) Enter the command which we have shared below in the command window.


"fastboot oem get_unlock_data


5) You will see a string on the window. Copy the string and paste it in notepad. Remove all the spaces and INFO from the string.


6) Now you have to open this website on your web browser. Use your Google account to sign in the website. Now copy the code which was in Notepad and paste it in the big box. Once you have pasted the code, click on Can my device be unlocked?


7) Now scroll at bottom and click on Unlock Key option followed by "I Agree". Now click on Request Unlock Key. You will receive an e-mail using which you logged in.


8) Open the mail and copy the key received in it. Now use the same command prompt which you used earlier to enter the command mentioned below.


"fastboot oem unlock “enter key here”

Hit Enter and the bootloader of your Moto X Play smartphone will get unlocked.

Sunday

How To Flash and Upgrade Spreadtrum Device Using SPD Tools

11:46 am 2
How To Flash and Upgrade Spreadtrum Device Using SPD Tools

How-To-Flash-and-Upgrade-Spreadtrum-Device-Using-SPD-Tools

This brief tutorial will guide you on How to flash, upgrade spreadtrum device using SPD Tool

Click here to download SPD Upgrade Tool


Procedure
1. Open the Research download tool > bin folder

2. Launch Research Download.exe

3. Click on the Load Packet icon (top left corner)

4. In the window that pops up, navigate to the location of the .pac file, select it then click Open

5. The pac file should now be loaded (its name should appear at the top)

6. Click the Settings Icon (top left corner)

7. In the box that pops up, uncheck any item(s) you do not wish to flash then click OK. Ignore this step if you wish to flash all files

8. Click the Start downloading button

9. You should see Waiting.... under the Progress bar

10. Switch off the phone (still with battery inside) then connect it to the PC via USB cord (note that you might need to hold the volume decease button while connecting to PC on some phones) and flashing should begin. DO NOT interrupt


11. Once flashing is complete, you'll see Passed

12. Click on the Stop downloading icon then disconnect the phone from PC and boot.

Request, Complain and Gratitude

Name

Email *

Message *