Monday
Thursday
Download All Gionee Stock ROM
Download all Gionee Factory Stock ROM firmware.
To download and learn how to use SP Flash Tools to un-brick or upgrade your phone, click here
To download and learn how to create scatter file and ROM Backup using MTK Droid Tools click here
Get all Gionee tools from here
Get all Gionee tools from here
- Gionee D1
- Gionee E3 Ginger Bread
- Gionee E3 Kitkat
- Gionee E5
- Gionee E6
- Gionee E7 Mini
- Gionee Elief E7 16GB
- Gionee Elief E7 32GB
- Gionee G1
- Gionee G2
- Gionee G3 1G RAM
- Gionee G3 512 RAM
- Gionee G3 8G ROM
- Gionee G4
- Gionee G5
- Gionee L700
- Gionee L800
- Gionee M2 4GB
- Gionee M2 8GB
- Gionee M3 Ginger Bread
- Gionee M3 Kitkat
- Gionee M3 Lollipop
- Gionee M5 Lite
- Gionee_M5_BBL7313GI
- Gionee_M5_T6184
- Gionee P1 OS 2.3
- Gionee P1
- Gionee P2 OS 4.2
- Gionee P2S OS 4.2
- Gionee P2 New
- Gionee P3 Ginger Bread
- Gionee P3 Kitkat
- Gionee P4S OS 4.4.2
- Gionee P4 Ginger Bread
- Gionee P4 OS 4.4.2
- Gionee P4 Kitkat
- Gionee P5.1 OS 4.4.2
- Gionee P6 OS 5.0
- Gionee S Plus 0204-T6075
- Gionee S Plus 0204-T6006
- Gionee S5.5
- Gionee S7
- Gionee S80
- Gionee S90
- Gionee S96
- Gionee T520
- Gionee V1
- Gionee V2
- Gionee V3
- Gionee V4
- Gionee V4S
- Gionee V5
- Gionee V6L
How to Create Stock ROM Using MTK Droid Tools
This Method will tech you how to create stock ROM using MTK droid tools, it is the same for all MTK Android Devices.
Tools Require
* A working Android phone
* Download PdaNet
* Download MTKDroid Tools
* PC
* USB Cord
* Enough space (at least 4GB) on the SD card / phone Storage (to avoid the insufficient storage space error)
Please Note
* If you get an error saying "Error: file adb not install" click here to fix it
* If you get an error saying "insufficient space on device" then ensure there's at least 4GB free space on both phone storage and SD card (if supported) then install Busybox on the phone
* If you get an error like "Preparation of files for FlashTool is impossible, file isn't found" then remove all scatter files in the backup folder except one and rename this last one to MT65??_Android_scatter ( where "??" represents the number for your phone model e.g MT6572_Android_scatter)
* If you get an error like "ERROR: Zero file, no space left on device!" click here
* If you get -- ERROR : --- TotalBytesPerChunk Not Found. Set default Page/Spare=2048/64 !!! then slot in an SD card into the phone and install Busybox on the phone.
Procedure
* Enable USB debugging on the good MTK phone (Settings > Developer > Tick USB Debugging) then connect it to PC. If you don't find Developer under Settings then go to Settings > About > Keep taping Build Number
* Install PdaNet on the PC with the USB debugging enabled working MTK phone still connected (Select Other from the list of devices during installation)
* At the end of PdaNet installation, you should get a "drivers successfully installed" message
* Exit PdaNet in system tray (bottom right corner of PC)
* Launch MTK droid tools as Administrator (right-click > run as Administrator) still with the working MTK phone connected to PC
* MTK droid tools should detect and display the phones details by the left along with a yellow box at the bottom
* Click ROOT at the bottom of MTK and select Yes/OK if prompted on PC and Grant if prompted on phone
* A progress bar should load at the bottom shortly after which the yellow box should become green
* Click on the root,backup,recovery tab at the top
* Click Backup (MTK should keep writing some things by the right hand side during backup) and wait till backup is complete
* If you get a prompt to pack backup, select No.
* Once backup is complete, don't close MTK droid tools
* Go to the MTK droid tools folder > Backups > Folder named after the phone's model e.g Tecno_m3_backup.... and take note of this folder as the 'Backup folder' because we'll be referring to it soon
* Go back to MTK droid tools and click 'To prepare blocks for Flash Tool'
* A window will open, in this window, navigate to the Backup folder (mentioned above) and select the md5 file
* MTK will start copying some items (check the right hand side) so wait till copying is complete
* Once copying is complete, open the Backup folder and you should see a folder named "!Files to flash"
* The !files to flash folder is a selection of files needed to use Sp Flash tool, keep it well
* Both the !files to flash folder and the x_backup folder (which contains the !files to flash folder) are your phone's MTK backup
* If you need an MTK Droid tools backup of usrdata and cache then use MTK Droid Tools version 2.3.0 or do a read back using Sp flash tool click here
This procedure is the same for all MTK based Android phones (e.g Tecno, Gionee, Infinix, TLC, Opsson, Innjoo, Lead1 etc )
# See the video tutorial below or @ http://youtu.be/AJLgSD9zHb8
Tools needed
* A working MTK phone
* Download PdaNet
* Download MTK Droid tools
* PC
* USB Cord
* Enough space (at least 4GB) on the SD card / phone Storare (to avoid the insufficient strorage space error)
Note
* If you get an error saying "Error: file adbd not install" then read https://forum.hovatek.com/thread-1219.html to fix it
* If you get an error saying "insufficient space on device" then ensure there's at least 4GB free space on both phone storage and SD card (if supported) then install Busybox on the phone
* If you get an error like "Preparation of files for FlashTool is impossible, file isn't found" then remove all scatter files in the backup folder except one and rename this last one to MT65??_Android_scatter ( where "??" represents the number for your phone model e.g MT6572_Android_scatter)
* If you get an error like "ERROR: Zero file, no space left on device!" then read https://forum.hovatek.com/thread-6407.html
* If you get -- ERROR : --- TotalBytesPerChunk Not Found. Set default Page/Spare=2048/64 !!! then slot in an SD card into the phone and install Busybox on the phone.
Procedure
* Enable USB debugging on the good MTK phone (Settings > Developer > Tick USB Debugging) then connect it to PC. If you don't find Developer under Settings then go to Settings > About > Keep taping Build Number
* Install PdaNet on the PC with the USB debugging enabled working MTK phone still connected (Select Other from the list of devices during installation)
* At the end of PdaNet installation, you should get a "drivers successfully installed" message
* Exit PdaNet in system tray (bottom right corner of PC)
* Launch MTK droid tools as Administrator (right-click > run as Administrator) still with the working MTK phone connected to PC
* MTK droid tools should detect and display the phones details by the left along with a yellow box at the bottom
* Click ROOT at the bottom of MTK and select Yes/OK if prompted on PC and Grant if prompted on phone
* A progress bar should load at the bottom shortly after which the yellow box should become green
* Click on the root,backup,recovery tab at the top
* Click Backup (MTK should keep writing some things by the right hand side during backup) and wait till backup is complete
* If you get a prompt to pack backup, select No.
* Once backup is complete, don't close MTK droid tools
* Go to the MTK droid tools folder > Backups > Folder named after the phone's model e.g Tecno_m3_backup.... and take note of this folder as the 'Backup folder' because we'll be referring to it soon
* Go back to MTK droid tools and click 'To prepare blocks for Flash Tool'
* A window will open, in this window, navigate to the Backup folder (mentioned above) and select the md5 file
* MTK will start copying some items (check the right hand side) so wait till copying is complete
* Once copying is complete, open the Backup folder and you should see a folder named "!Files to flash"
* The !files to flash folder is a selection of files needed to use Sp Flash tool, keep it well
* Both the !files to flash folder and the x_backup folder (which contains the !files to flash folder) are your phone's MTK backup
* If you need an MTK Droid tools backup of usrdata and cache then use MTK Droid Tools version 2.3.0 or do a read back using Sp flash tool (see https://forum.hovatek.com/thread-526.html ) - See more at: https://forum.hovatek.com/thread-468.html#sthash.S6wsocNU.dpuf
How To Unbrick Android Phone Using SP-Flash Tools
Have you damage your handheld device software? Do you want to fix it and don`t know how? This simple and effective method will teach you how to unbrick android phones using Sp-flash tools
Requirement
* A PC
* USB Cord
* Click here to download and Manually install VCOM drivers on your PC
* Ensure there's an SD card in the phone you wish to flash the files to
* Scatter file + files to be flashed Click here to see how to make an MTK Backup).
* Download SP Flash tool ( Version 5.x )
Note
If you get any error in SP Flash tool or the phone still didn't work after flashing, I made a list of SP Flash Tool errors, their meanings and how to resolve them click here to see.
Procedure
- Remove the battery from the phone and slot it back in without booting the phone (If the battery is inbuilt then simply switch if off). Also, ensure there's a formatted SD card in the phone (if there's an SD card slot)
- Launch SP Flash Tool as Administrator
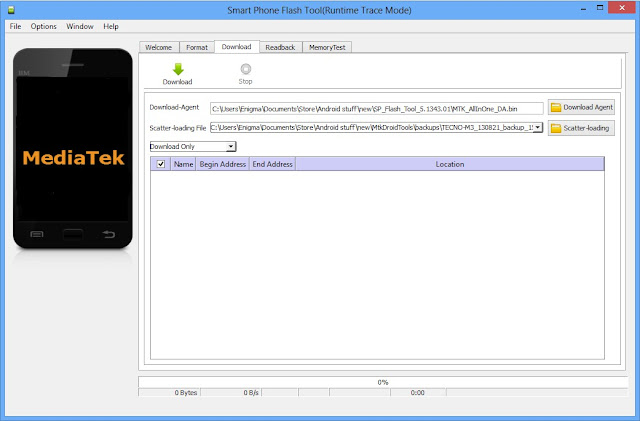
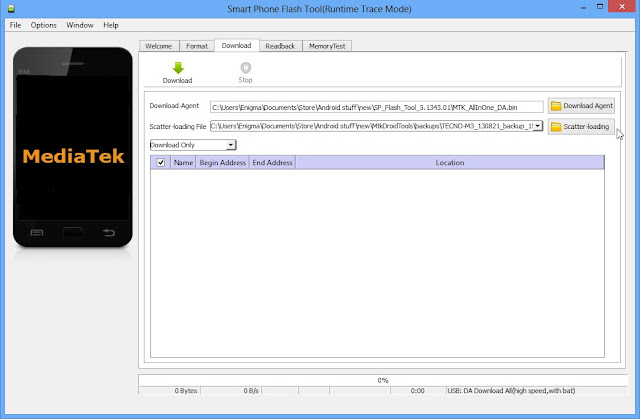
- Click on Scatter-loading by the right
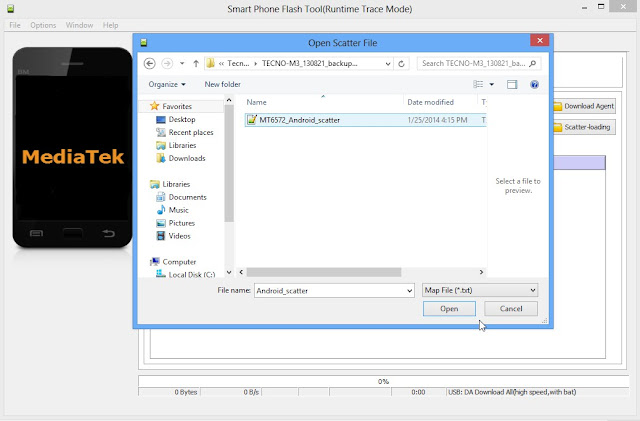
- In the window that pops up, select the scatter file for your phone model then click Open (scatter file is a text file with the word "scatter" in its name
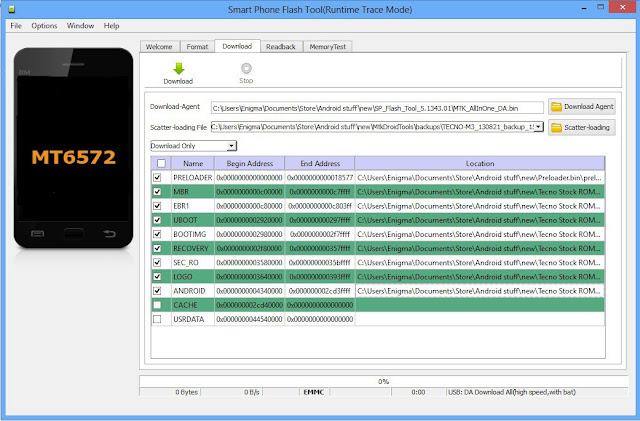
- A list with ticked boxes should appear in SP flash tool (preloader, mbr, ebr etc)
- Step a,b,c,d,e,f
These steps is only for when you wish to format the phone. Skip if you don't wish to format
- a. Click Format at the top
- b. After clicking Format, a dialogue box will pop up, ensure that 'Auto Format Flash' and 'Format whole flash without Boot-loader' are selected
- c. Click OK, Stop should now be red or green in color
- d. Connect the switched off phone (with battery inside) to the PC via USB cord
- e. A progress bar should load till you get a 'Success' message (green circle with OK)
- f. Disconnect the phone from PC
- . Uncheck the box in front of any item you do not wish to flash
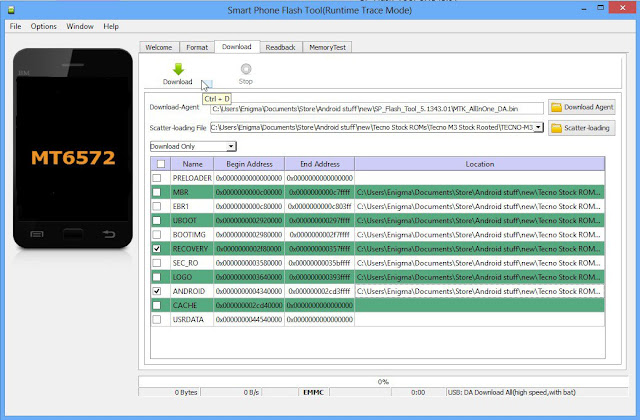
- To manually load an item that doesn't automatically get ticked after loading the scatter file, tick the box in front of that item then double-click its Location and select the corresponding file in the window that pops up
- Once the file(s) you wish to flash is (are) ticked, click Download (with an arrow above it)
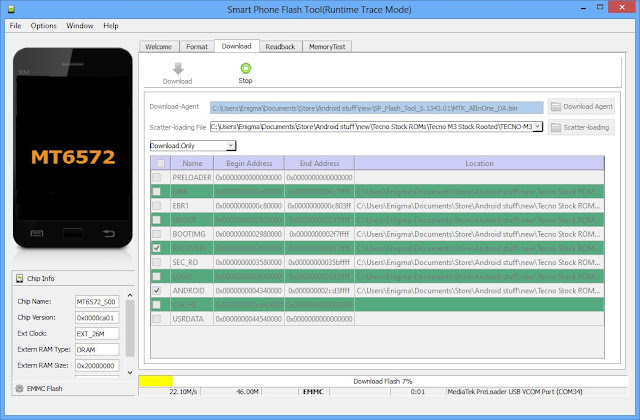
- Stop should now be prominent while other options should be grayed out
- Connect the switched off phone (with battery inside) to the PC via USB cord
- A progress bar should start running.
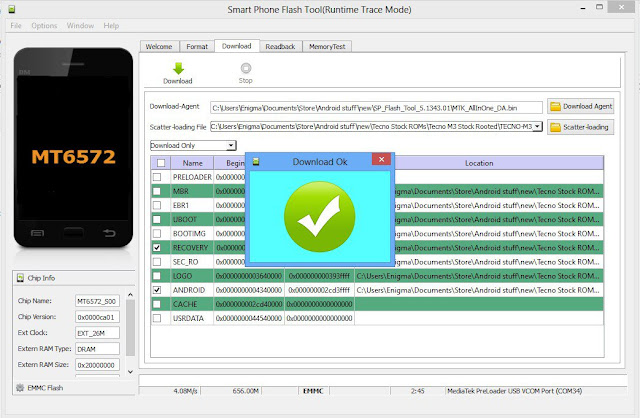
- Wait till you get a Success message (green circle with OK), do not interrupt before then
- Disconnect the phone, remove the battery for 15 seconds (if removable), slot it back in then power up the phone
- Ensure to do a factory reset in recovery mode to clear any errors
How To Install MT65xx MediaTek USB VCOM Drivers on Window Manually
This tutorial will teach you how to install MT65xx mediatek USB VCOM drives on any windows operating system manually. It is a straight and painless procedure, so sit back and enjoy.
Requirement
Note:
Procedure
Requirement
- Download MediaTek USB VCOM drivers
- Download USB Deview ( 32 bit here : 64 bit here )
Note:
- You might need to disable drivers signature verification in Windows for this to work smoothly.
- If you have access to a working phone of the same model then remove the battery from the working phone and connect to PC via USB cord. Mediatek preloader VCOM drivers should be automatically installed so you can skip the rest of this guide
Procedure
- Install USB Deview and use it to uninstall all Vcom, Mediatek and Preloader drivers
- Extract the contents of the Mediatek USB VCOM file above (input Hovatek if it file request for a password when extracting)
- In Windows, go to Control Panel and open Device Manager
- Click any of the device groups (any of the items on the list) you see there, then from Action menu, select Add legacy hardware
- Add hardware wizard will be opened, click next
- Select Install the hardware that I manually select from a list (Advanced)
- Click next two times and click Have Disk button
- Click browse and find where your driver's .inf file is, then select it (the .inf you'll select is located in drivers > USB Vcom driver > your OS) . Ensure to select the 64 bit .inf if your PC is 64 bit
- Click Open and OK. You will see the drivers listed.
- Select your driver there (select Mediatek Preloader USB VCOM Port)
- Click Next and finish installing
- If SP flash tool or other software still dont detect your phone then also install Mediatek DA VCOM (consider installing more from the list of drivers one at a time if need be )
- If you get the code 10 error after the installation, simply ignore it and proceed with SP flash tool. You're only getting that error because the driver is not digitally signed.
How
to manually install MT65xx (MediaTek) USB VCOM drivers on Windows - See
more at: https://forum.hovatek.com/thread-440.html#sthash.5Md8TUUb.dpuf
Requirement
1. Download MediaTek USB VCOM drivers
2. Download USB Deview ( 32 bit here : 64 bit here )
Note:
* You might need to disable drivers signature verification in Windows for this to work smoothly. see http://forum.hovatek.com/thread-752.html for the procedure
* If you have access to a working phone of the same model then remove the battery from the working phone and connect to PC via USB cord. Mediatek preloader VCOM drivers should be automatically installed so you can skip the rest of this guide
Procedure
# See the video tutorial below or @ http://youtu.be/sADkzyI8Z5Q
1. Install USBDeview and use it to uninstall all Vcom, Mediatek and Preloader drivers
1b. Extract the contents of the Mediatek USB VCOM file above ( The Password when extracting is Hovatek )
2. In Windows, go to Control Panel and open Device Manager
3. Click any of the device groups (any of the items on the list) you see there, then from Action menu, select Add legacy hardware
4. Add hardware wizard will be opened, click next
5. Select Install the hardware that I manually select from a list (Advanced)
6. Click next two times and click Have Disk button
7. Click browse and find where your driver's .inf file is, then select it (the .inf you'll select is located in drivers > USB Vcom driver > your OS) . Ensure to select the 64 bit .inf if your PC is 64 bit
8. Click Open and OK. You will see the drivers listed.
9. Select your driver there (select Mediatek Preloader USB VCOM Port)
10. Click Next and finish installing
11. If SP flash tool or other software still dont detect your phone then also install Mediatek DA VCOM (consider installing more from the list of drivers one at a time if need be )
12. If you get the code 10 error after the installation, simply ignore it and proceed with SP flash tool. You're only getting that error because the driver is not digitally signed.
- See more at: https://forum.hovatek.com/thread-440.html#sthash.5Md8TUUb.dpuf


