ROM GURUS

ROM GURUS

Looking for firmware, Stock ROM or how to go about that phone problem? You are in the right place, get all you want here for free...

https://static1.freebitco.in/banners/728x90-3.png

Breaking

Wednesday

How to Screen cast on Android – Step by Step

8:57 pm 0
How to Screen cast on Android – Step by Step
If you would like to record screencast videos of your own Android phone, the good news is that you don’t need to install any app nor do you have to root your device. The not-so-good news is that you can only capture screencasts on phones (or tablets) that are running Android 4.4 or later. Also, screencasts will not have any audio.
How-to-Screen

Step 1: Prepare your Android Device for Screencasting

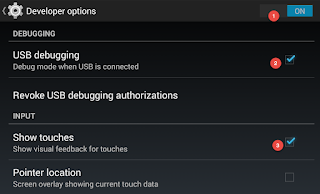
Open your Android phone settings and go to About Phone, the last option in the list. Next tap Build Number seven times in quick succession and you’ll see a message saying that Developer Options have been enabled in your device.

Step 2: Prepare your computer (Windows or Mac)

We need to install the Android SDK on our desktop. This is simple. All you have to do is download the SDK in a zip file from the android.com website and unzip the file anywhere on your computer.

The Android SDK is available for both Mac and Windows.

Step 3: Connect your Android phone to the desktop

First connect your Android phone to your computer though the regular micro USB cable. The phone will display a prompt asking you to “Allow USB debugging.” Tap OK to continue.

Step 4: Record the Screencast Video

Run the follow command to enter recording mode. Advanced users may refer to the help manual to learn about the various options supported by screenrecord.

adb shell screenrecord --verbose ./sdcard/screencast-video.mp4

If you are using a Mac, you the command line code should be written as:

./adb shell screenrecord --verbose ./sdcard/screencast-recording.mp4

Now switch to your phone and whatever you do here will get recorded in the video. When you are done, go to command window and press Ctrl + C to stop the video recording. The screencast is now saved in your Android phone.

You can use a File manager app, I prefer File Wrangler, to search for the screencast-video.mp4 file on the phone and transfer it to your desktop for editing.

Tuesday

How to Bypass iCloud Activation Lock On All iOS Devices

8:26 am 8
How to Bypass iCloud Activation Lock On All iOS Devices
How-to-Bypass-iCloud-Activation-Lock-On-All-iOS-Devices
We all know that losing an iPhone or iPad can be one of the most horrible experiences in your life as both of your devices may have many personal and private details of yours. But finding somebody's iPhone can be equally challenging as you wish to (or need to) give the phone back to its owner. Just imagine that you have stumbled upon an iPhone that belongs to somebody else, and with all good intentions, you want to return that iPhone to its owner.
Even with your bona fides, you won't be able to do so until you get the contact number or email id of the owner. Since the phone is locked, you cannot have access to anything stored inside. Moreover, if the owner has not put its iPhone on Lost Mode, you won't be able to see a custom message set by the owner.

How to Bypass iCloud Activation Lock in iOS 9 or iOS 8 for iPhone and iPad
While you have an iPhone in your hand, you are on “Activate iPhone Screen“. Now press the home button and tap on Wi-Fi Settings; now tap on “i” next to Wi-Fi symbol. From here, you need to follow below mentioned steps after removing the existing DNS. (In this situation, there is a way to help the owner get his phone back. Bypass iCloud Lock in iOS 9 or iOS 8 for iPhone. This method works from iOS 9.2 to iOS 8.)

Step #1. The new DNS you need to type in is as below:
  •     If you are in USA/North America, type in 104.154.51.7
  •     If you are in Europe, type in 104.155.28.90
  •     If are in Asia, type in 104.155.220.58
  •     In rest of the world, type in 78.109.17.60
Step #2. Tap on Back.

Step #3. Now tap on Done.

Step #4. Tap on Activation Help.

Once it is done, now you can see some text on the iPhone that reads, “You have successfully connected to my server.”

By tapping on Menu on the top right, you can access different functions like iCloud Locked User Chat, Social, Internet, Mail, Maps, YouTube, Video, Audio, Games and more.

If you want to bypass iOS 9 activation lock permanently, follow a few more steps.
Step #1. Tap on the Menu.

Step #2. Go down to Applications and tap on it.

Step #3. Now tap on Crash. With this action, your iPhone will respiring to the home screen, where you can see Apple logo.

Step #4. Now select your language and country.

Step #5. Tap on the home button and select more Wi-Fi settings.

Step #6. Tap on “i.”

Step #7. Scroll down and tap on Menu under HTTP PROXY.

Step #8. Clear the address bar and tap on the Globe on the keyboard.

Step #9. Type in 15 to 30 characters randomly and type in “8888” in front of Port and tap on Back.

Step #10. Now again tap on Next.

Finally, keep sliding to unlock and click the language options for 2-3 minutes without giving your fingers any rest. This action will lead you to the home screen of iPhone.

Now, you can access 3 applications – Phone, Newsstand, and FaceTime. But every time you open one of the apps, you need to restart the iPhone.

Here is the real official deal

Several cases has been reported, when people buy a used iPhone, with locked iCloud account.
Though most of the times, the sellers can be approached to unlock the device, there are times they intentionally keep the iCloud account locked. In such circumstances, people have to take the help of service providers who charge not the just hefty amount but also take several days to get the work done.

So, what's the right solution to unlock the iCloud account as easily as you would like? Let us find out!
How to Unlock your iPhone's iCloud Account on iPhone/iPad

Step #1. First off, visit click here to visit Official iPhone Unlock
Step #2. Next up, click on “iCloud Unlock” from the Sidebar menu.

Step #3. Up next, enter the iPhone model, IMEI number of the iPhone you want to unlock the iCloud account. If you don't know how to get it, then dial *#06# to get the IMEI number.
In case, the iPhone is locked, and you aren't able to use the dialer, then you need to tap on the “i” on the device screen to get the IMEI number.

Step #4. Now, make payment and wait for 1-3 days to get your iCloud account unlocked.
If you would require further information, please click here to Official iPhone Unlock.
How-to-Bypass-iCloud-Activation-Lock-On-All-iOS-Devices

Friday

How To Fix Dead Tecno Camon C8 Devices

2:04 am 0
How To Fix Dead Tecno Camon C8 Devices
How-to-fix-dead-Tecno-Camon-C8-devices
This simple guide will teach you how to fix a dead Tecno Camon C8.
So many of us,  mostly trial versions testers, are into frequent upgrading & downgrading of ROM. But what if you mistakenly shifted your laptop or cable & your phone refuses to respond at all? It happened to me so, I used this method to unbrick my prestigious Camon C8, it will surely work for every other MTK device.

Thursday

How To Make G00gle Assistant Work On Any Android Devices

5:31 am 0
How To Make G00gle Assistant Work On Any Android Devices
This brief tutorial will school you on how to make G00gle Assistant work on your Android device, no matter the OS you are running. Stay back and read carefully.

How-To-Make-G00gle-Assistant-Work-On-Any-Android-Devices

After doing away with it's popular Nexus line-up, yours truly G00gle, has finally become a mainstream Android manufacturer with Pixel. One of the most stunning features of g00gle Pixel is the new AI assistant which seems like a nice alternative to Siri, and you’ll be very glad to know that there is a way to enable G00gle Assistant on any Android device, meaning that you don't necessarily need to buy a pixel phone.


While there are a lot of reasons you would want to get one, I don't think most Android users won’t be jumping the ship right away.

However, to get the best of AI and personal assistance, you will need the following things to get started.

1. An Android device running Android 7.0 Nougat or higher.
Android 7.0, I  know most OEMs haven't upgraded their devices to 7.0 yet but if you're lucky to have Upgraded to Nougat , you can continue with this.

2. Root access.

3.The latest version of G00gle app (version 6.5.35.21 or newer) installed on the device.

How to enable G00gle Assistant on any Android Nougat device

To begin using the G00gle Assistant service, you need to add or replace a line to your device’s root files. In order to access the root directory, you will need a file explorer with root access, so go ahead download any free app like  ES File Explorer from the g00gle Play Store.

Please read the following Instruction carefully in other not to damage your device

Once downloaded, grant the app Superuser access and head over to the root partition of your device, which is the highest folder in the folder tree. From the root directory, access the “System” folder and make sure that the directory is mounted as read/write (Mount R/W). Scroll down to the bottom of the folder to find a file named “build.prop ” and long-press it. On the “Options” menu that appears, press “Open with” and then select “Text Editor” from the pop-up window.


Once you have the “build.prop ” file open in the text editor, scroll down to the bottom of the list and enter these lines:

ro.product.model=Pixel XL
ro.opa.eligible_device=true


Once you have entered the code line mentioned above, press the menu button and save the changes you have made. To make sure that g000gle Assistant works without any issues, wipe the cache and the data of the G00gle app.

Restart your Android device once you have saved the file and exited the file manager app. 

You are done!!

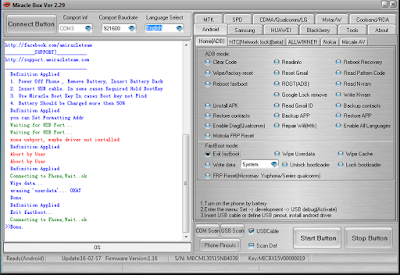
Steps On How To Use Miracle Box To Flash MTK Android Devices

5:14 am 3
Steps On How To Use Miracle Box To Flash MTK Android Devices
Steps-On-How-To-Use-Miracle-Box-To-Flash-MTK-Android-Devices

This simple steps will guide you on how to use Miracle Box to Flash Android MTK Devices.

Required Downloads:

Here are the steps:

 Step #1. Download Miracle Box from the Download Section below this guide.


Step #2: Extract the Miracle Box zip file into a folder on your PC.

Step #3: Locate Miracle loader.exe from within the Miracle Box folder and double click it to launch the Miracle loader.exe (preferably, launch it as administrator).


Step #4. Wait till Miracle Box opens and the Dashboard is fully loaded.


Step #5. Click the MTK Tab and then, tickets Write.


Step #6. Select the phone's chipset from the dropdown menu e.g MT6589.


Step #7: Click the folder icon visible to you.


Step #8: In the window that pops up, browse or navigate to the folder where you have the stock ROM firmware for the MTK Android device you wish to Flash and select the firmware for the phone model. It should be in .bin format and then click Open it.


Step #9. Click the Start button.


Step #10. Switch off the phone (with a charged battery inside it) then connect it to the PC via USB cord. Miracle Box should detect the phone almost immediately.


Step #11. Miracle box should begin flashing the firmware, wait till it gets to 100%.


Step #12. Once it gets to 100%, close Miracle box and disconnect the phone.


At this point you have successfully flashed stock ROM firmware on your MTK Android device using Miracle Box.

Congratulations!!!

Request, Complain and Gratitude

Name

Email *

Message *