ROM GURUS

Looking for firmware, Stock ROM or how to go about that phone problem? You are in the right place, get all you want here for free...

https://static1.freebitco.in/banners/728x90-3.png

Tuesday

How to Transfer Movies from Android to iPad iOS Without iTunes

2:28 am 0
How to Transfer Movies from Android to iPad iOS Without iTunes
How-to-Transfer-Movies-from-Android-to-iPad-iOS-Without-iTunes

Do you have a boring iPad that is sitting as a glorified “mp3 player that can snap great pictures and browse the internet”? Are you constantly frustrated that you cannot transfer those great pix taken during an event instantly to your friend without having to connect to the internet.No doubt, iPad has a good battery life, so why not use it to watch those movies you downloaded on your android. Worry no more, as this guide will however teach you how to transfer movies from Android to iPad iOS without the use of iTunes.


Xender is the solution
Most of the file transfer apps require you to be on the same WiFi network but with Xender you just need the app to be installed on both devices (and it is free on iTunes and PlayStore).

  1. Download and install Xender to your Android, iPad or BB10.
  2. Open Xender on your Android
  3.  Select “Connect Phone”.
  4. From the lower part of the next screen, select the smaller “Connect iPhone” icon.
  5. Go to Settings on your iPad and switch on the WLAN.
  6. The WLAN would list the network available, select the one starting with “ADYYTG….”
  7. Still on the iPad, go back and open the Xender application.
  8. Select “Connect Phone”, both devices should play a short notification sound which means that they are connected.
  9. Select the pictures or movies you wish to send and select “Send” on the sending device and watch the progress on the receiving device.
Download here


Please Note: On Tecno devices, Xender is the new version of Flashshare, you can install Xender for updates and uninstall the old Flashshare if you so desire.

Wednesday

How to Hard Reset Nokia Lumia and Microsoft Lumia Phones

8:19 am 0
How to Hard Reset Nokia Lumia and Microsoft Lumia Phones
This guide will teach you how to hard reset Nokia Lumia and Microsoft Lumia phone. If you want to hard reset your Nokia Lumia or Microsoft Lumia phones because of reasons like security code or software malfunction, do the following below.
 

*All file and apps will be erased after this process. It is recommended you backup your device before proceeding.

Supported Device: Nokia Lumia 520/635/710/810/925 etc
 

1) Put OFF the device
2) Press Power Button 


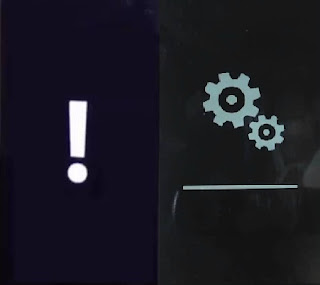
When phone vibrates leave power button and press volume down button till you see exclamation sign   
3) Now press the following button combination
Volume up(+)> Volume down (-)> Power > Volume Down(-)
Phone will reboot and you will see gear like wheel spinning .
4) Wait for 10-25min for process to complete.
Phone will reboot after process is complete..


How-to-Hard-Reset-Nokia-Lumia-and-Microsoft-Lumia-Phones


For Lumia 800 / 900 
  • Put OFF the device
  • Press and hold Volume down(-) > Camera >Power button for about 10 secs
  • When phone vibrates release Power button but still hold on to Volume down(-) and Camera button
Reset Process will begin
Wait for process to complete as it could take close to 8 - 30mins.

Monday

Download Wiko Android Stock ROM

4:04 am 1
Download Wiko Android Stock ROM
Download-Wiko-Android-Stock-ROM
Download Wiko Android Stock ROM or firmware.
  1. Wiko Barry 
  2. Wiko Cing King 
  3. Wiko Cing Peux
  4. Wiko Cing Slim
  5. Wiko Cing Plus
  6. Wiko Darkfull
  7. Wiko Darkmoon
  8. Wiko Sunset
  9. Wiko Sunset 2
  10. Wiko Lenny 2

To download and learn how to use SP Flash Tools to un-brick your phone, click here
To download and learn how to create scatter file and ROM Backup using MTK Droid Tools click here

*Note: To flash this device, Extract the zip file, open content folder and run the .exe file. Follow the screen instruction.
You can request for any Wiko Stock ROM, I have them and I can upload at your request. 

Thursday

How To Root Infinix Hot Note x551 Android 5.1 Lollipop

9:09 am 4
How To Root Infinix Hot Note x551 Android 5.1 Lollipop
This guide will teach you how to root Infinix Hot Note x551 running on Android 5.1 Lollipop.Infinix HOT Note X551 can be update to android 5.1 Lollipop as we are all aware of. Some find it very difficult to root this device after successful update. Recently, someone called regarding this issue.
If you wish to update your Infinix HOT Note X551 to Android 5.1 Lollipop click here

  • Download SP Flash Tool from here
  • Download Android USB Drivers from here  
  • Download and extract recovery from here  
  • Download SuperSu.zip from here or here  
  • Copy SuperSu.zip to your SD Card Root. (Not in any folder)
  • Launch SP Flash Tool  7) Click on Scatter button  
  • Select the Scatter file from the recovery folder you extracted  and Click Download button.  
  • Turn off your device then connect it to your PC
 
How-to-Root-Infinix-Hot-Note-x551-Android-5.1-Lollipop

Wait for SP Flash Tool to detect and flash the recovery. (Takes close to 6-10 seconds for to complete)
  Most times, it is required that you flash this recovery twice before it work (I said "Most times") may not applied.
 
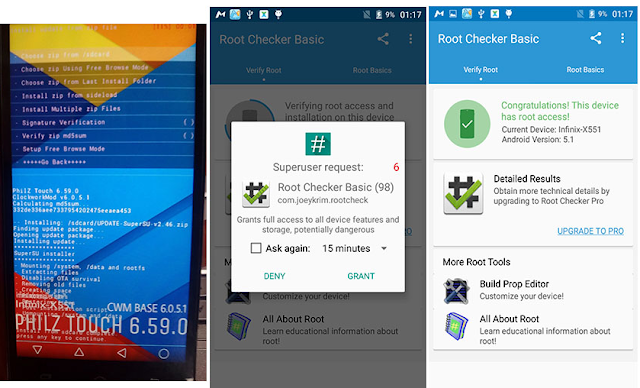
  • Now boot your phone to Philz recovery by holding volume up(+) and power button for 4-5 secs  
  • Select install from zip.
  • Choose SuperSu.zip from your SD card  
  • Select Yes to install.
  Wait for process to complete.

Android Device Shortcuts

12:31 am 0
Android Device Shortcuts
I present to you Android device Hidden Secret Codes you may not have come across before .


*#*#778O#*#* = Factory Data Reset

*#*#I472365#*#* = Quick GPS Test

*#*#0673#*#* OR *#*#0289#*#* = Audio Test


*#*#2664#*#* = Touch Screen Test

#’#273283*255*663282*#*#* = Backup Media Files

*#*#0283#*#* = Packet Loopback Test

*2767*3855# = Reinstalls The Phones Firmware & Format Your Phone

*#*#232339#*#* OR *#*#526#*#* = wireless Lan Test

*#*# 1575#*#* = Different GPS Test

*#*#4636#*#*‘ = Complete Information About your Phone

*#*#2663#*#* = Touch Screen Version

*#*#232337#*# = Displays bluetooth Device Address

*#*#4986*2650468#*#* = PDA, Phone. Hardware, RF Call Date

*#*#44336#*#* = Displays Build Time

*#06# = Displays IMEI Number

*#*#8255#*#* = Google Talk Service Monitoring

*#*#I I I I#*#* | *‘#*#2222#*#* = FTA Software Version FTA | Hardware \/Version

*#*#3264#*#* = Rom version

*#*#23233I#‘*#* = bluetooth Test

*#*# 1234#’#’ = PDA and Phone Firmware Info

*#*#0*#*#*= LCD Display Test


*#*#0842#*#* Vibration and Backlight Test

*#*#0588#*#* = Proximity Sensor Test

*#*#232338#*#* = Wi-Fi Mac Address

*#*#7262626#*#*= Field Test

*#*#34971539#*#* = Camera Update

*#*#19732840#*#* = Enable Test Mode

*#06# – IMEI number

*#0*# – Enter the service menu on newer phones like Galaxy S III

*#*#4636#*#* – Phone information, usage statistics and battery

*#*#34971539#*#* – Detailed camera information

*#*#273282*255*663282*#*#* – Immediate backup of all media files

*#*#197328640#*#* – Enable test mode for service

*#*#232339#*#* – Wireless LAN tests

*#*#0842#*#* – Backlight/vibration test

*#*#2664#*#* – Test the touchscreen

*#*#1111#*#* – FTA software version (1234 in the same code will give PDA and firmware version)

*#12580*369# – Software and hardware info

*#9090# – Diagnostic configuration

*#872564# – USB logging control

*#9900# – System dump mode

*#301279# – HSDPA/HSUPA Control Menu

*#7465625# – View phone lock status

*#*#7780#*#* – Reset the /data partition to factory state

*2767*3855# – Format device to factory state (will delete everything on phone)

##7764726 – Hidden service menu for Motorola Droid

*#*#7594#*#* – Enable direct powering down of device once this code is entered

*#*#273283*255*663282*#*#* – Make a quick backup of all the media files on your Android device

*#*#232338#*#* – Shows Wi-Fi MAC address

*#*#1472365#*#* – Perform a quick GPS test

*#*#1575#*#* – For a more advanced GPS test

*#*#0283#*#* – Perform a packet loopback test

*#*#0*#*#* – Run an LCD display test

*#*#0289#*#* – Run Audio test

*#*#2663#*#* – Show device’s touch-screen version

*#*#0588#*#* – Perform a proximity sensor test

*#*#3264#*#* – Show RAM version

*#*#232331#*#* – Run Bluetooth test

*#*#232337#*# – Show device’s Bluetooth address

*#*#7262626#*#* – Perform a field test

*#*#8255#*#* – Monitor Google Talk service

*#*#4986*2650468#*#* – Show Phone, Hardware, PDA, RF Call Date firmware info

*#*#1234#*#* – Show PDA and Phone firmware info


*#*#2222#*#* – Show FTA Hardware version

*#*#44336#*#* – Show Build time and change list number

*#*#8351#*#* – Enable voice dialing log mode, dial *#*#8350#*#* to disable it

##778 (+call) – Show EPST menu

These codes are specific to HTC devices only:

*#*#3424#*#* – Run HTC function test program

*#*#4636#*#* – Show HTC info menu

##8626337# – Run VOCODER

##33284# – Perform field test

*#*#8255#*#* – Launch Google Talk service monitor

##3424# – Run diagnostic mode

##3282# – Show EPST menu

##786# – Reverse Logistics Support


Did it work? please leave us a comment.

Request, Complain and Gratitude

Name

Email *

Message *