ROM GURUS

Looking for firmware, Stock ROM or how to go about that phone problem? You are in the right place, get all you want here for free...

https://static1.freebitco.in/banners/728x90-3.png

Friday

Download All Tecno ClockWorkMod Recovery Images and Scatter File

11:22 am 0
Download All Tecno ClockWorkMod Recovery Images and Scatter File
Download-all-Tecno-ClockWorkMod-Recovery-Images-and-Scatter-File

CWM or ClockWorkMod recovery is a customized recovery for Android devices developed by Koushik Dutta that enables you to do numerous advance task which the default Stock recovery isn`t capable of. A list of some Tecno ClockWorkMod CWM Recovery images and scatter file are available for download.

These CWM recovery can undergo or perform task ranging from:  
  1. Installing Custom ROMs 
  2. Gain root access  
  3. Partition Memory Space  
  4. Backup and Restore ROMs   
  5. Install kernels, mods, themes, GAPPs, fonts etc 
  6. Factory Reset device and many more....

And should you prefer to customize your Android device using advance method, CWM or any other custom
recovery at best is perfectly suitable for this operation.

Here is a list of some selected Tecno devices CWM Recovery Images.

You can also install recovery using any of the alternative methods below.

The files shared on this page also contains scatter file which you can use with SP-flash tool.
Extract the .Rar archive to get your recovery image and scatter file then use your desired method.
Learn how to create CWM Recovery Images click here


  1. Tecno A3 CWM Recovery & Scatter file
  2. Tecno A7 CWM Recovery & Scatter file
  3. Tecno Phantom A+ (F7) CWM Recovery & Scatter file
  4. Tecno Phantom 5 Recovery & Scatter file
  5. Tecno Camon C8 Recovery & Scatter file
  6. Tecno Camon C5 Recovery & Scatter file
  7. Tecno D3 CWM Recovery & Scatter file
  8. Tecno D5 CWM Recovery & Scatter file
  9. Tecno F5 CWM Recovery & Scatter file 
  10. Tecno F6 CWM Recovery & Scatter file
  11. Tecno F7 CWM Recovery & Scatter file
  12. Tecno G9 CWM Recovery & Scatter file
  13. Tecno H5 CWM Recovery & Scatter file
  14. Tecno H6 CWM Recovery & Scatter file
  15. Tecno H7 CWM Recovery & Scatter file
  16. Tecno Boom J7  Recovery & Scatter file
  17. Tecno L3 CWM Recovery & Scatter file
  18. Tecno L6 CWM Recovery & Scatter file
  19. Tecno M3 CWM Recovery & Scatter file
  20. Tecno M5 CWM Recovery & Scatter file
  21. Tecno M6 CWM Recovery & Scatter file
  22. Tecno M7 CWM Recovery & Scatter file
  23. Tecno M9 CWM Recovery & Scatter file
  24. Tecno N3 CWM Recovery & Scatter file
  25. Tecno N7 CWM Recovery & Scatter file
  26. Tecno N9 CWM Recovery & Scatter file
  27. Tecno P5 CWM Recovery & Scatter file
  28. Tecno P9 CWM Recovery & Scatter file
  29. Tecno R7 CWM Recovery & Scatter file 
  30. Tecno S3 CWM Recovery & Scatter file
  31. Tecno S7 CWM Recovery & Scatter file
  32. Tecno Q1 CWM Recovery & Scatter file
  33. Tecno Y6 CWM Recovery & Scatter file


More will be added shortly 

Monday

How To Flash Recovery Images Using Mobile Uncle

9:38 am 0
How To Flash Recovery Images Using Mobile Uncle
This tutorial will teach how to flash recovery images using mobile uncle. If you`ve downloaded recovery image (CWM, TWRP or Philz or any other) and you do not have a PC and want to flash it to your device, here is a detailed but brief information on how to do so using "Mobile Uncle Tool"
*Note: You must root your device before commencing this process.

Click here to download and root your device using Kingo Android Root
or Click here to download and Root with iRoot

Download and install MobileUncle Tool from Playstore
 
How-To-Flash-Recovery-Images-Using-Mobile-Uncle
  • Download the Stock or custom recovery you want to flash to your device (You can search this blog for that and Ensure that it is compatible with your device). Note the name of the recovery.
  • Launch Mobile Uncle Tools 
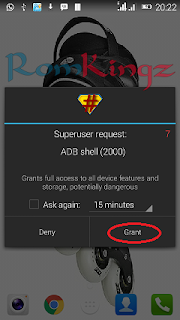
  • Grant Super User access to MobileUncle 
  • Select Recovery Update from the list of options
  • Now select recovery.img file you want to flash and press OK.
  • Mobile Uncle will now flash the recovery to your device.
  • The process can take up to 60seconds or more

Press OK when done and wait for your device to reboot into the new recovery.

To manually boot into Recovery, hold volume up (+) and power button for about 3 secs.

With the recovery installed you can do things like
  • Backup and restore your ROM
  • Install custom ROM(s) on the device
  • Flash different packages to your device (e.g update.zip, SusperSu.zip etc)
  • Factory reset device and more.

How To Flash Boot Image and Recovery Using Flashify

9:37 am 0
How To Flash Boot Image and Recovery Using Flashify
Image result wey dey for Flashify
I f you find it very complex and complicated using fasboot method to work on your deviece, here is an other quick and easy alternative to flash recovery or boot image to your device using Flashify.
 *Note, your device must be rooted before commencing this operation.
If your haven`t root your device, using the link below.

Click here to download and root your device using Kingo Android Root
or Click here to download and Root with iRoot
 
Download the IMG file you want to flash.
Click here to download and install flashify via Google Playstore.


How to Install ClockWorkMod on MTK Android Devices

9:35 am 0
How to Install ClockWorkMod on MTK Android Devices
This tutorial will teach you how to Install ClockWorkMod on MTK, Android Devices. CWM Recovery is the most popular replacement recovery on Android devices. It can be use to backup or restore ROM(s) on Android devices platforms, Install Custom ROM flash update.zip packages like CyanogenMod, Gapps, adb shell, factory set device and other numerous functions.

This write up will briefly guide you on how to install CWM Recovery on MTK device.

*Note: You must root your device before commencing this process.

Click here to download and root your device using Kingo Android Root
or Click here to download and Root with iRoot

Click here to download and install Android adb drivers
Click here to download MTK Droid Tools

  • Launch MTK Droid Tools
  • Enable debugging mode on your device. Go to settings > developers option > enable debug mode
  • Connect the device to the computer and wait for MTK Droid tools to detect
  • If the device is rooted a yellow box is seen at the bottom left of the screen.
  • Now click the ROOT button bottom right and grant Super User access on your device.
How-to-Install-ClockWorkMod-on-MTK-Android-Devices

*The yellow box will now turn green.
*Now click on backup, root, recovery tab.
*Tick to use boot from phone.
*Now click Recovery and Boot button.


A dialogue box will appear "To make CWM recovery automatically ?" 
  • Select Yes
A second dialogue box will appear "If the phone isn't loaded, it is necessary to flash this file through Flash Tool! Install patched boot to phone? " 
  • Select No.
Another dialogue box "Install created recovery to phone?"

  • Select Yes
The last dialogue box will appear "To reload phone in recover?"

  • Select Yes.
Your device will now boot into CWM recovery

If that doesn't happen, press volume up and power button to boot into CWM recovery mode.

Congratulations, you have just installed CWM to your device.

Tuesday

OnePlus 2 Android update: Oxygen OS 2.1.0 Is Here

3:47 am 0
OnePlus 2 Android update: Oxygen OS 2.1.0 Is Here
The OnePlus 2 Android update to Oxygen OS 2.1.0 has started rolling out over-the-air (OTA). Though it's going to take a while to arrive to all devices, you can flash the update yourself right now via the link at the bottom. Read on for details of the latest OnePlus 2 Android update.

    Forget 2.0.2, Oxygen OS 2.1.0 is rolling out now. The Oxygen 2.1.0 update was announced via the OnePlus forums, with the following improvements:
    OnePlus-2-Android-update:-Oxygen-OS 2.1.0-Is-Here
    • Manual camera mode
    • Raw support for 3rd party camera apps
    • Color balance slider in Display settings for adjusting the color tone of the screen. (A feature recently seen on the Huawei Mate S)
    • Added Exchange support
    • Fixes for problems with popular 3rd party apps
    • Telephony service improvements so you no longer "lag" when you turn airplane mode on or off
    • Other bug fixes and improvements
    While these updates are welcome, it's unclear whether they cover some of the issues we were expecting. Several problems have been reported as a result of installing the previous update, Oxygen OS 2.0.2, including battery drain, fingerprint scanner issues, poor quality images from the front-facing camera, and broken third-party camera apps.
    While the latter has been fixed, and manual mode could improve the front-facing camera quality, we'll have to wait to see whether the other problems have been fully addressed. You can download the Oxygen OS 2.1.0 zip file here to flash the update yourself, should you wish to do so.
    Have you had any problems with the OnePlus 2? What additions do you want to see in Oxygen OS 2.1? Let us know in the comments.

    Request, Complain and Gratitude

    Name

    Email *

    Message *